When it comes to generating images that follow structure or control, ControlNet is the tool that quietly steps up and does the heavy lifting. It doesn't take the spotlight the way flashy prompt-tweaking does, but it's essential when you want your model to listen, not just speak. Now, training ControlNet with Hugging Face's diffusers library might sound like you're about to wade through a sea of scripts and headaches. But once you break it down, it's just another process that works, granted, with some care and attention.
Without any further ado, let’s walk through how to train your own ControlNet using diffusers, one part at a time.
Before jumping into any training, you need a workspace that doesn’t break mid-process. First off, make sure your machine (or cloud setup) is equipped with a strong GPU—16GB VRAM is kind of the floor here.
Start by installing the necessary libraries. If you're not already set up with diffusers, transformers, and accelerators, now's the time.
bash
CopyEdit
pip install diffusers[training] transformers accelerate datasets
If you're working on a forked or custom pipeline, cloning from GitHub and using editable installs will save time in the long run.
bash
CopyEdit
git clone https://github.com/huggingface/diffusers.git
cd diffusers
pip install -e .
Make sure your versions line up. Out-of-sync packages quietly break everything down the line.
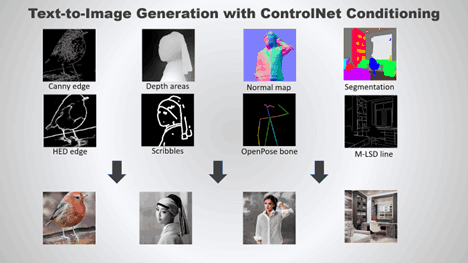
ControlNet training isn’t just about feeding a model images—it needs conditioning data too. That’s what sets it apart from regular image generation models. You’ll need paired data: an input condition (like a pose map, edge map, depth map, etc.) and its corresponding image.
Structure your dataset directory like this:
arduino
CopyEdit
dataset/
├── condition/
│ ├── 00001.png
│ ├── 00002.png
├── image/
│ ├── 00001.jpg
│ ├── 00002.jpg
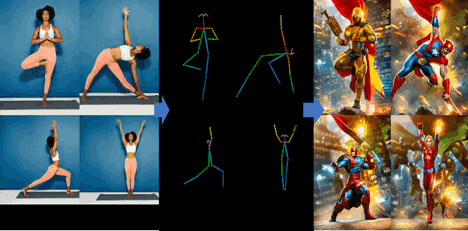
If you're dealing with a dataset that doesn't already have conditioning images, preprocessing scripts (like OpenPose for human poses or MiDaS for depth estimation) can help generate them.
Make sure the dimensions match, the aspect ratios stay consistent, and your preprocessing doesn’t introduce mismatches. That kind of noise derails your loss function quietly and quickly.
The base diffusers repo includes a train_controlnet.py script under the examples directory. It handles most of the boilerplate, but you’ll need to feed in paths and set a few arguments correctly.
Here's a simplified call to the script:
bash
CopyEdit
accelerate launch train_controlnet.py \
--pretrained_model_name_or_path="runwayml/stable-diffusion-v1-5" \
--dataset_name="path/to/your/dataset" \
--conditioning_image_column="condition" \
--image_column="image" \
--output_dir="./controlnet-output" \
--train_batch_size=4 \
--gradient_accumulation_steps=2 \
--learning_rate=1e-5 \
--num_train_epochs=10 \
--checkpointing_steps=500 \
--validation_steps=1000
One thing you’ll notice early on—ControlNet models aren’t trained from scratch. You’re fine-tuning from a base like stable-diffusion-v1-5. ControlNet acts as an add-on module, learning how to inject structure while leaving the main diffusion weights untouched.
There’s also the option to use --use_ema for exponential moving average. It helps with stability if you’re training longer than a few epochs.
As training kicks off, you’ll want to monitor loss values—but in ControlNet’s case, watching the validation images speaks louder than numbers. Every few hundred steps, your script can generate sample images using the conditioning input. That’s where you’ll notice whether the model is just memorizing the training data or actually learning how to apply structure.
If your validation outputs are either too blurry or ignore the structure, check:
Diffusion models can be forgiving in many ways, but ControlNet depends heavily on accurate, aligned data. Small mismatches in pose maps or edge inputs will show up loudly in output images.
For long trainings, enable checkpointing. If something crashes, you won’t be starting from zero. And for evaluation, don’t rely on just one type of prompt—diverse inputs show you whether your ControlNet can generalize.
Once you're happy with your model, it's time to save and load it properly for inference. Use the from_pretrained method to load your new ControlNet alongside a pipeline:
python
CopyEdit
from diffusers import StableDiffusionControlNetPipeline, ControlNetModel
from transformers import CLIPTokenizer
controlnet = ControlNetModel.from_pretrained("path/to/controlnet")
pipe = StableDiffusionControlNetPipeline.from_pretrained(
"runwayml/stable-diffusion-v1-5", controlnet=controlnet
)
pipe.to("cuda")
Make sure the conditioning image at inference time matches the kind you used in training. If you trained with Canny edges, you can't just switch to depth maps and expect magic. ControlNet learns how to respond to a specific type of structural signal, and swapping that input breaks the connection it was trained to follow.
The diffusers pipeline is friendly to customization. You can slot in schedulers, modify prompts, and adjust generation settings easily. But the real win here is that you now have a ControlNet that listens to structure—a model that understands both language and form.
Training ControlNet with diffusers might feel technical on the surface, but it’s built with enough flexibility to keep things sane. As long as your dataset is aligned and your config is clean, the process mostly stays out of your way. And when it’s done, you get a model that doesn’t just make images—it follows instructions. That part? Pretty satisfying.
What's equally important is how training your own ControlNet opens the door to creative control. Whether you're working on stylized art, layout-constrained design, or visual tasks that demand structure, having a model tuned to your specific data lets you stop depending on prompt hacks and start building intent-driven outputs. It's not just better results—it’s better control over how those results come together.
Failures often occur without visible warning. Confidence can mask instability.
We’ve learned that speed is not judgment. Explore the technical and philosophical reasons why human discernment remains the irreplaceable final layer in any critical decision-making pipeline.

Understand AI vs Human Intelligence with clear examples, strengths, and how human reasoning still plays a central role

Writing proficiency is accelerated by personalized, instant feedback. This article details how advanced computational systems act as a tireless writing mentor.

Mastercard fights back fraud with artificial intelligence, using real-time AI fraud detection to secure global transactions
AI code hallucinations can lead to hidden security risks in development workflows and software deployments

Small language models are gaining ground as researchers prioritize performance, speed, and efficient AI models
How generative AI is transforming the music industry, offering groundbreaking tools and opportunities for artists, producers, and fans alike.
Exploring the rise of advanced robotics and intelligent automation, showcasing how dexterous machines are transforming industries and shaping the future.

What a smart home is, how it works, and how home automation simplifies daily living with connected technology
Bridge the gap between engineers and analysts using shared language, strong data contracts, and simple weekly routines.
Optimize your organization's success by effectively implementing AI with proper planning, data accuracy, and clear objectives.